Shameless plug: With the best free educational resources (Raw-U), the most robust free brewing tools, and the most outstanding organic scobys, kombucha kits, tea blends, flavoring blends & more, we can help you reach your brewing goals. So check out our products — that’s an order, Booch! 😉 #rawbrewingco #ilikeitraw
Kombucha & pH
Always check your brew's pH when starting a new batch!
Starting pH is crucial for your ferment!
We get a lot of questions here at the brewery about kombucha pH -- and whether or not you need to check it. The most common one is "do I really need to check my brew's pH?" Like most things in life, the answer for the home brewer isn't always black and white, but here's the philosophical question: "do you want your brew to taste great every time, be consistent every time, and make sure you never lose a batch?" Of course you do! One of the keys to that is pH testing, and the easiest way to do that is with our pH test strips. Starting a first batch? Our Honey Jun SCOBY with pH strips makes setup simple.
Kombucha can be a little intimidating when you’re first getting started, but the truth is it’s easy, and once you’ve got the right tools and information it’s a breeze. But experienced brewers know that it’s important to respect the process and know your stuff -- pH is no different. Understanding how to correctly start is crucial for a successful, healthy brew. And one of the keys to consistently crafting brewery quality kombucha at home is starting pH.
Without the right starting pH, several issues can arise. First (and most importantly), your brew is at exponentially higher risk for mold. The correct level acidity in your brew, indicated by the pH, will help kill off those potential pesky invaders. Second, your brews will be inconsistent in flavor and finishing time. But if you track your pH, you can be a booch master too. Again, the easiest way to check your brew’s starting pH is with Raw Brewing Co pH Test Strips.
And if you want to brew like a pro, always follow our PRO TIPS below.
So what is pH and what’s the right number?

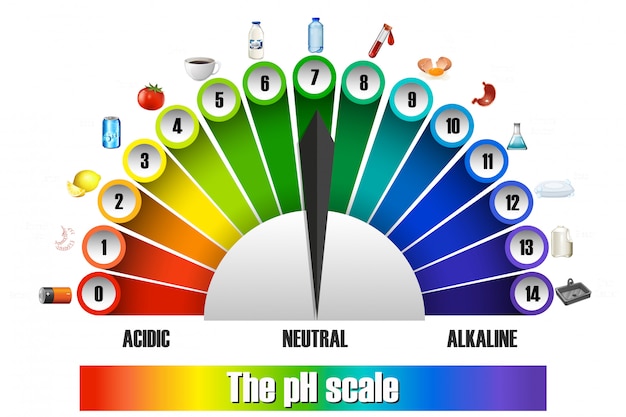
pH is a measure of acidity or alkalinity, and the scale goes from 0 (extremely acidic) to 14 (extremely alkaline), with 7 in the middle representing a neutral pH. When making kombucha, you need to start your brew at the right pH: 3.5-4.5. Just like the Richter scale for earthquakes, the pH scale is logarithmic. This means each whole number represents a 10x increase or decrease vs the next whole number. For example, a pH of 4 is ten times more acidic than a pH of 5 -- and 100 times (10 times 10) more acidic than pH 6.
First, never start a kombucha ferment above 4.5, as it exponentially increases the risk for mold. And checking your brew’s starting pH is easy. After you combine your SCOBY and starter liquid with room temperature sweet tea, simply grab a clean spoon, take a spoonful of your brew, and dip a Raw Brewing Co pH Test Strip in it for half a second. Compare the color change on the strip to the color chart included with our pH test strips -- the closest match is your brew's pH. If your pH is too high, add more starter liquid. And if your pH is lower than you’d like, simply add more sweet tea. For a detailed tutorial on how to properly use Raw Brewing Co pH Test Strips, checkout our post on How To Use Brewing pH Strips.
Here's the catch: the good bacteria in kombucha create acids, so (if you did things right) the pH will decrease throughout the ferment. The lower the pH, the more tart your kombucha will be -- so keep your eye on it!
PRO TIP: Most commercial brewers start at 4 and finish at 3.
How does pH affect kombucha?

From the experience of somebody drinking a kombucha, pH mostly affects the flavor. The lower the pH, the more acid in the kombucha, and the more vinegary tartness the booch will have. However, the important information is in the biochemistry and getting your brew started.
Here's the deal: when you first start your ferment, your brew is at the most vulnerable to foreign invaders (mold, foreign yeasts, and foreign bacteria). This is because there is far less beneficial bacteria (and the beneficial acid they produce) to fend off the bad guys. So how do you fend off the bad guys? With proper pH!
The bacteria and yeast in a healthy kombucha scoby thrive in an acidic environment of 4.5 or lower. The invaders that can spoil your kombucha thrive in less acidic environments above 4.5. This is why it is so important to check the pH of your brew a few minutes after adding your starting liquid. Starting a batch with too high of pH is almost always the reason a batch brewed from a previously healthy scoby (and of course in a proper temperature range of 74-84°F) fails.
Never start your brew above 4.5! Here at the brewery, we start at pH of 4 and finish at 3. Remember the lower your starting pH, the more yeast and bacteria you added with the starter liquid, so the faster your ferment will finish.
How much starter liquid do I need?
There’s several factors that can affect your brew’s starting pH: how much sugar you use, the pH of your water supply, how strong your starter liquid is, etc. Generally speaking, after getting into a brewing cycle, using about 10% starter liquid is a good place to start. For instance, if you’re making a 1-gallon batch, use 1/10th of a gallon of starter liquid. But save a little extra just in case -- and most importantly, pH test your brew! Additionally, starting your first batch with a healthy scoby and strong starter culture like Gaia or Honey is important to help you hit the ground running.
PRO TIP: Most commercial brewers calculate exactly how much starter they need to add to their new batch to start at a pH of 4. Our Starter Liquid Calculator can do the work for you.
When you start your brew...

If we keep in mind the logarithmic nature of the pH scale, that means starting at 4 and finishing at 3, the kombucha becomes 10x more acidic during the fermentation, due to the magic of the yeast and bacteria! The most common reason for inconsistent results at home is because of inconsistent starting pH. For example, if it has been months since you've made a batch and your booch is super vinegary, you won't need as much starter liquid. But if it's been fermenting for a week and you want to make more kombucha, you'll need more starter liquid, because that week-old batch is not nearly as strong as the one that's been going for months. But how will you know...unless you check your starting pH every time?!
Can I add vinegar if my starting pH is too high?
Contrary to what many online sources claim, you can add vinegar if your starting pH is too high. However, there’s only one type of vinegar that’s acceptable for bringing your brew’s pH down: white vinegar. Whether or not it’s distilled is unimportant, as it’s the same thing -- the only difference is the strength of the vinegar. White vinegar has been pasteurized, so there’s no yeast or bacteria in it that can interfere with your brew. Never add apple cider vinegar or any other vinegar, as it can change the biology of your ferment and introduce different yeast and bacteria which could outcompete your brew. But white vinegar is highly acidic stuff, so don't add too much -- start with 1 tablespoon, stir, and test again.
During Fermentation

All else equal, a batch of kombucha ferments faster or slower for two reasons: how much starting liquid (and how strong the liquid is), and temperatures during fermentation (warmer temperatures finish in less time than cooler ones). DO NOT ALLOW YOUR BREW TO FALL BELOW 74°F DURING FERMENTATION – cold equals mold. And remember, if you use a heat mat, do not allow your brew to go above 84°F – higher temps can stress your culture (or kill it, if high enough) and/or create undesired off-flavors.
With regard to pH testing (during fermentation) in home brew settings, you can go either way: test pH every couple of days, or don't test at all and drink your booch when it tastes ready. It's personal preference, but consistently testing your batches will help you produce more consistent product and up your booch game in general. In a commercial brewery setting, it's imperative to check your pH levels every few days.
But I've never checked, never had a batch go bad, and I'm a guru!

Sorry, not a guru...yet! Gurus always check their starting pH, without fail, every time. Because gurus understand the value of the knowledge it bestows. Look, we get it...most people who've never checked their pH and who can read directions have never had a batch go bad. That doesn't mean they're going to be able to brew consistent, store-bought quality kombucha at home, every time...and that's the point. You get that consistency by (among other things) starting with the same pH, every time. Be a guru...always check your starting pH.
What should I use to check my pH levels?
There are two basic ways the home and commercial brewer can check pH: pH strips or a pH meter. There are pros and cons to each. The easiest and most reliable way for the home brewer is pH strips. The most precise way is a well-calibrated pH meter, but calibration takes extra time and product, and such a precise measurement isn't needed for home brewers. For the home brewer (and often times the commercial brewer alike) we recommend the pH test strips available in the kombucha.com store.
So You Want to Brew Consistently Like a Pro?
Brewing kombucha like a pro is simpler than you might think! Just follow these easy steps:
-
Start with a Strong Culture: Opt for robust cultures like Gaia or Honey to ensure a healthy and active fermentation process.
-
Use pH Test Strips: Always test your brew's starting and finishing pH with pH test strips to maintain the right acidity levels.
-
Monitor Fermentation Temperature: Utilize an adhesive thermometer to keep a close eye on your brew's fermentation temperature.
-
Start Your Brew at a pH of 4: Initiating your brew at this pH level helps in creating the ideal environment for fermentation.
-
Maintain Optimal Temperature Range: Keep your brew between 74-84°F during fermentation. Remember, consistent temperatures yield consistent results from batch to batch. For consistent results, the use of a heat mat is generally imperative.
-
Finish Your Brew at a pH of 3: Concluding your brew at this pH level ensures the right balance of acidity and flavor.
And there you have it! By following these straightforward steps, you're well on your way to brewing consistently like a pro. Happy brewing, Booches!


Leave a comment